Saturday 10 November 2012

Saturday doughnuts

With no time for a yeast-based concoction tonight, we went for a sour cream cake doughnut with a vanilla frosting. While yeast doughnuts will always be my favourite for their lighter texture and a flavourful but not-too-sweet dough, these are a good quick treat (quick for me, at least, when I come home to dough that's already chilled and ready to go!)

The recipe is found here, but various people take ownership of the same recipe on multiple websites.

We previously used Crisco to fry yeast doughnuts as Dave read somewhere that it leaves behind less flavour.  I think this is  true, although this batch was prepared in Canola oil.

Glazed while hot, immediately after patting down with paper towel to remove excess oil
Some were double glazed for a thick vanilla frosting

My third doughnut of the evening!

Sunday 24 June 2012

Yolk eggs...only a few months late!

I was absolutely thrilled to see this message on the window of the West Vancouver Lululemon store a few months ago:


You know those Purdy's cream eggs that most people seem to find far too sweet? Well, I can eat three in one sitting and still crave more! They are perhaps my favourite sugary candy. And when it comes to running...well, this window posting highlights one of the major reasons why I run: so that I can eat more treats!

Dave and I have made a few attempts at Purdy's cream eggs but haven't been able to reproduce the wonderfully smooth, gooey centres surrounded by crisp dark chocolate...until now!

We used this recipe from food.com (although note that having grown up in BC I feel that Cadbury cream eggs just cannot compare to the Purdy's version. Our final product didn't taste like either but was far superior to both!):

There are a few important modifications:

1. Add only as much icing sugar as you like - 3 cups makes them a bit dry for my liking. 1-2 cups yielded a much creamier result.

2. We had a bit of a fiasco on our hands when we froze the yolks, then tried to cover them with whites, then tried to get them into chocolate molds. If you don't add all the icing sugar, they are VERY difficult to work with. If you have a chocolate mold, I'd suggest working with the filling while it is still in paste form, then freezing before completing the egg (or top of the mold, depending what shape you use).

3. I like salt, probably a little more than I should - but I did think that doubling the salt really enhanced the flavour and provided a nice contrast with the chocolate.

4. You must use very good chocolate or they're not worth eating. We buy Callebaut chocolate in bulk from Superstore and try to temper it first.


We used flower-shaped molds, which are very convenient for chocolate-making...so this was in fact a bit of a variation on an egg. Interestingly, some recipes suggest using invertase to liquefy the filling - but this takes about 5 days, which means you can't eat them right away, and I just don't have the patience for this technique. I thought this filling was the perfect consistency once the icing sugar content was adjusted to my liking.

If eating the cream egg by itself isn't for you, the Huffington post has some excellent cream egg pairing suggestions.

Wednesday 4 April 2012

Motivations of an MD/PhD student

In the past few weeks I have encountered some common misconceptions about the dual life of a clinician-scientist in early training, mostly among my very well-intentioned medical classmates. These include the following:

1. You get to travel to exotic places, which must be the major highlight of this type of training...where are you going next? Actually, while several international meetings have been incredibly worthwhile experiences in my training thus far, it wasn't the exotic nature of the location that determined (1) my participation or (2) what I took away from them. Many of these experiences have involved going to conference sessions during the day and watching medicine lectures or writing DPAS papers at night, or flying home early to supervise students, keep up with experiment end-points, run a research forum, or write final exams. That said, I feel very lucky to have had the opportunity to learn from some of the world's top experts in my area of interest, and indeed to have spent at least enough time in cities to which I otherwise would not have traveled to know that I would like to go back (in a non-academic capacity)!

2. You have lots of free time to party with other beer-drinking grad students.
This is true only when I am a full-time graduate student, which is not often - and even then, we have the equivalent of three years for the PhD component (out of the seven year program), so for me this means that it's usually necessary to take advantage of any full work days I can get (ie. days without medical or graduate classes). UBC has an integrated program format during which the second year of medicine is spread over three years. Consequently, for the first four years of the dual degree, most of us are always doing some medicine and some research, to varying extents. I miss the grad student beer sessions because I'm in clinical skills classes, and I miss the med student wine sessions because I'm in the lab (and I'd like to clear up another apparent misconception - most graduate students I know in the sciences work days that are just as long and focused - sometimes heavier on the focus!). That said, I think it is an incredible privilege to spend time with 3-4 different years of medical students and to develop lasting friendships with fellow graduate students and lab colleagues.

3. You aren't in "Doctor, Patient, and Society" so you must be skipping class just like everyone else. I often start my work day at the lab on Mondays and Wednesdays once morning lectures are finished. Every MD/PhD student has arranged his or her curriculum in different ways, but many of us (especially during the core second year medicine blocks) are also trying to maintain some sort of semblance of productivity at the lab bench. We either took the classes already or will do so in the future...and I guarantee you, if you tease me about skipping a class I'm not enrolled in after I've been up all night trying to get our Live Cell microscope to focus properly, my response might be less gracious than you would expect!

My point? I think this dual training program - and in particular the integrated format - is incredibly rewarding. It's not merely an excuse to travel, take a break, or get out of clinical training. None of these would provide nearly sufficient motivation.

Thursday 1 December 2011

First fondant attempt

Rationale

There are so many things I should be doing other than icing practice for a wedding cake that we won't be eating until next August (writing the review article that I need to submit this month or the presentation I am giving next week would be obvious alternatives). However, it seems that browsing through wedding cake recipes has become my method of choice for procrastination. I am shocked at how commercialized the art of cake decorating is. One could spend the same amount on the various cake-making gadgets at Michael's as on a professionally-decorated cake!

Never having decorated a cake with fondant, I thought I'd start to develop a recipe.

The basic recipe (Adapted from an online illustrated version by Paul of CakesCanada.com)


Sift 450 g of icing sugar.

Add 1/2 tbsp gelatin to 1/4 cup water. Let sit for 5 min, then melt over boiling water.

Add 1/4 cup light corn syrup, 1/2 tbsp glycerine, and desired flavouring (tonight, in my case, this included vanilla, Grand Marnier, lemon curd, orange rind, and orange extract). Stir until the mixture is homogeneous, still over boiling water (or recently boiled water from a kettle if you use your stove as a storage surface and can't be bothered to turn it on!)

Add the liquid mixture to one half the volume of sugar. Mix by hand, then add an additional 1/2 cup of sugar. Continue adding sugar, 1/4 cup at a time. If you have a stand mixer with a dough hook, this is a great use for it. If not, use a solid spoon.

Once the mixture loses its stickiness or you can no longer get the sugar incorporated by hand, turn it out onto a well-sugared surface and continue to incorporate the sugar while kneading. The final consistency should be relatively dry and not sticky, but still very pliable and easily rolled out into a sheet.

Thoughts on fondant

It was easier than I thought to obtain an ideal consistency for rolling and shaping, so long as everything that came in contact with the fondant was coated in icing sugar (alternatively, according to many online sources that offer advice on the subject, shortening also works well).

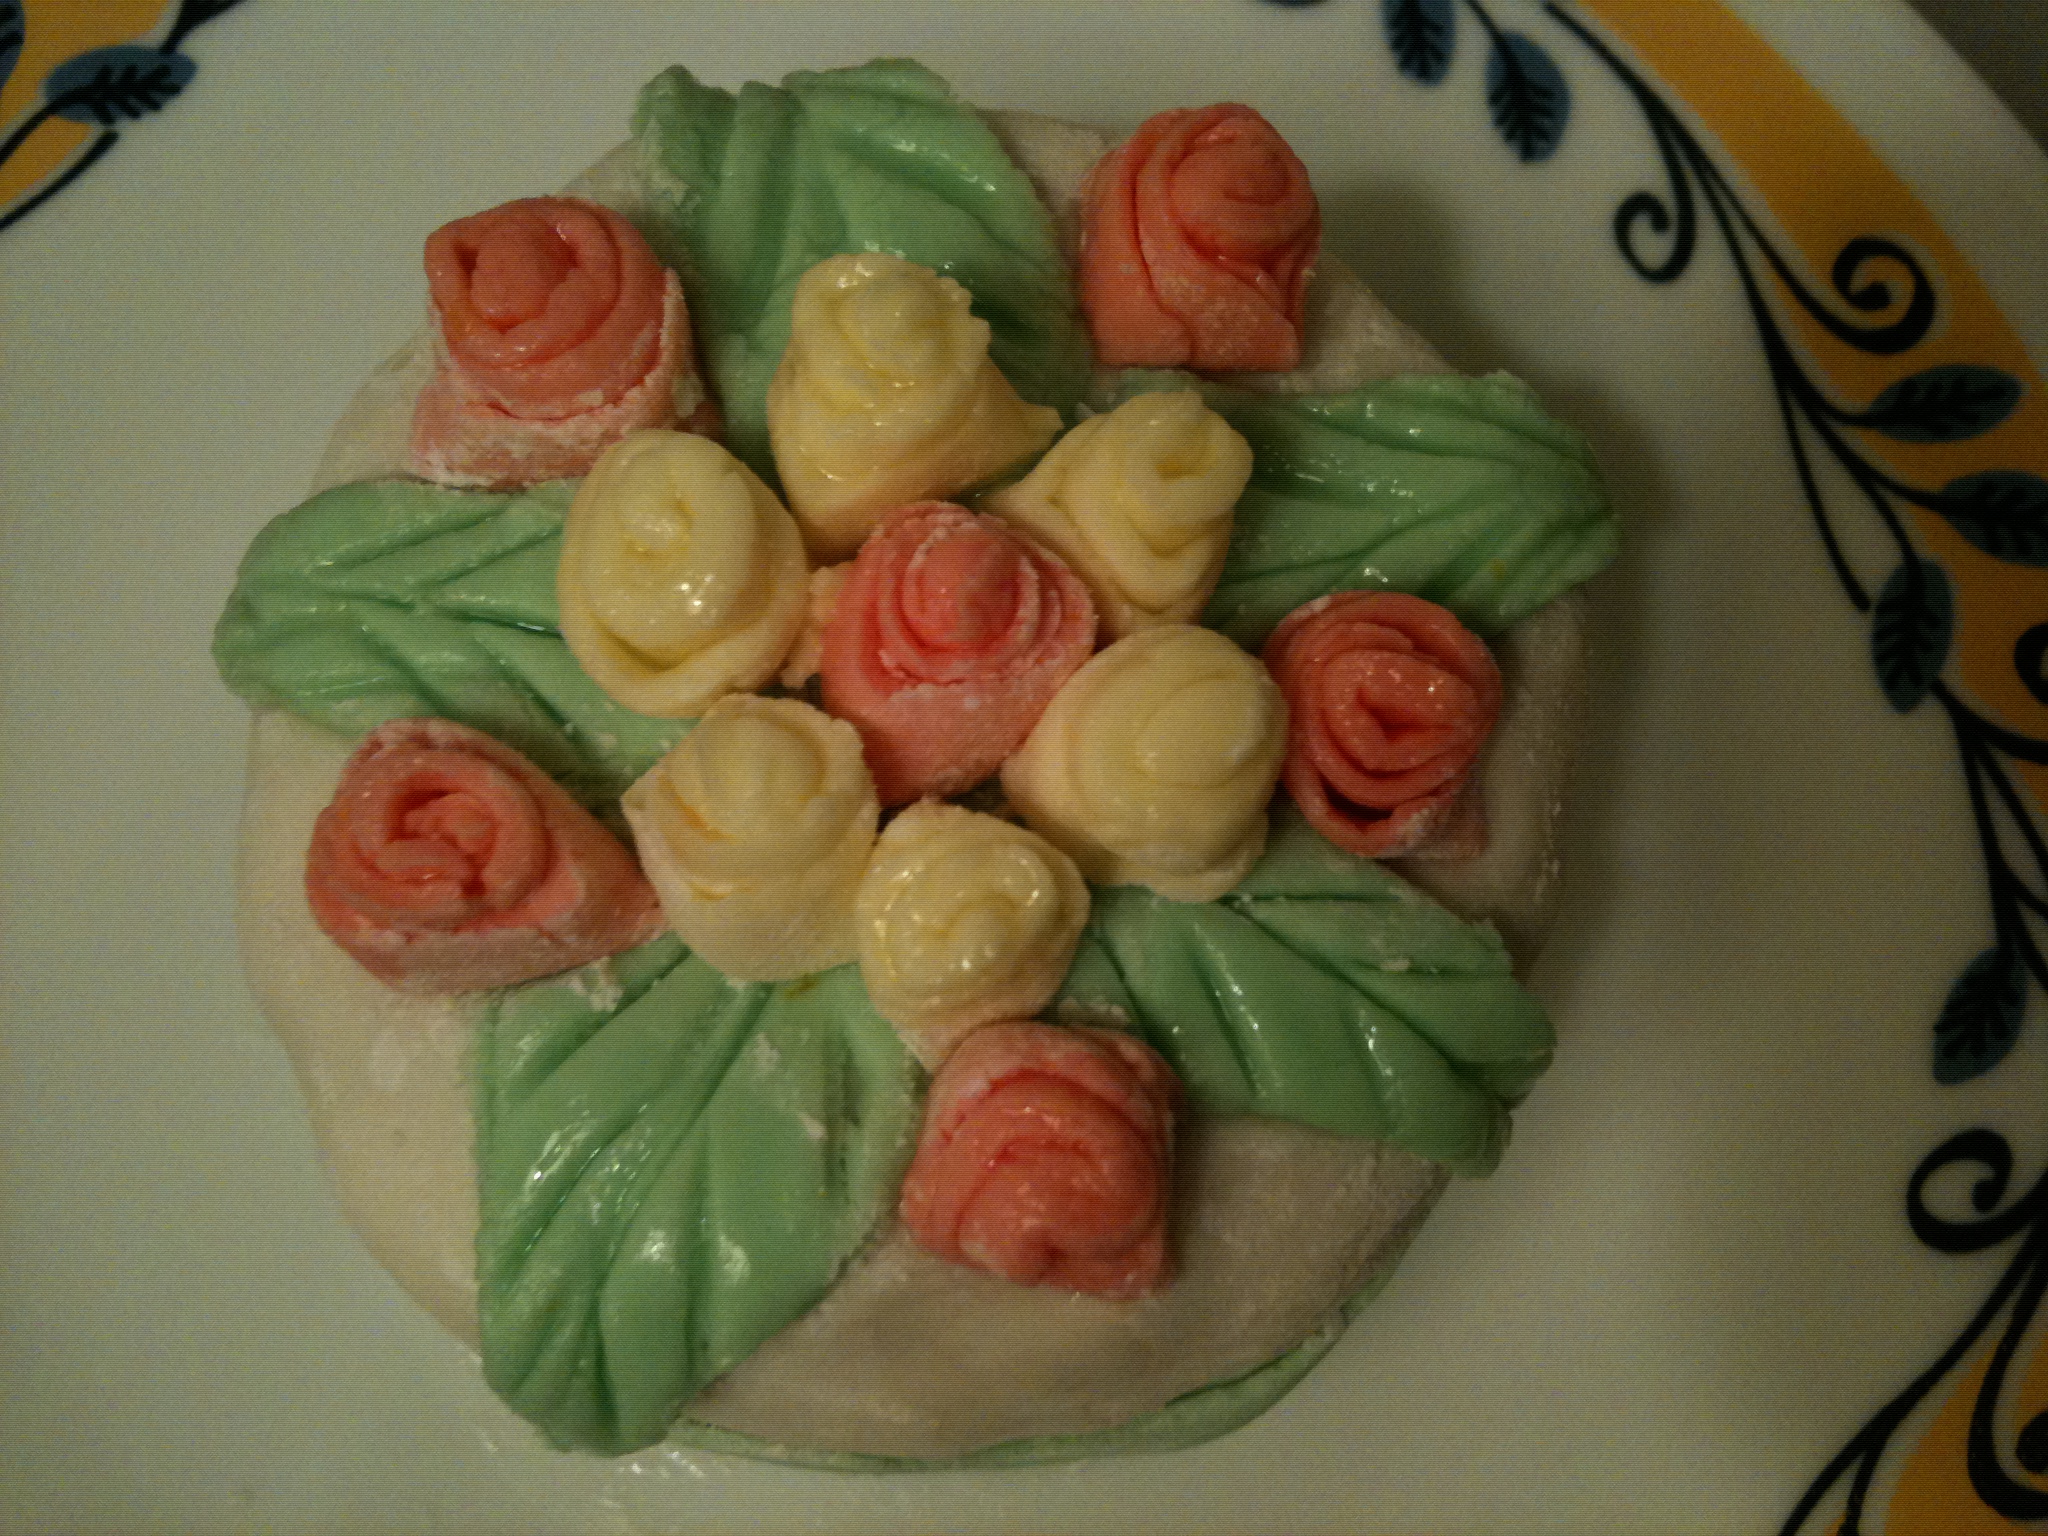
I grabbed a frozen cupcake from my freezer and covered that with a sheet of the basic fondant, then added some colouring to make some flowers and leaves.

I still need to work on the flavour - perhaps more lemon curd would make it richer and more buttery. Of course I suppose the idea with a fondant is to avoid butter, but I don't see how a little bit could hurt! In fact, I think I'd like to try this recipe next:

http://cakecentral.com/recipes/michele-fosters-delicious-fondant/

Not sure if I'll eat the cupcake yet!


Thursday 20 October 2011

Lemon curd

This thick lemony paste is delicious almost anywhere you put it - on toast or yogurt, between layers of a cake, or in a lemon pie. You might obtain a slightly better consistency using a low heat on the stove top, but this microwave method is so easy that I tend to stick to it. The key is to ensure the microwave is on low to medium power.

Materials

4 lemons. Peel, then microwave on high for 1 min to make them juicy. Juice.
4 eggs (always a better product if you use good eggs with nice yellow yolks).
1/2 cup butter, cut into small cubes.
1 1/4 cups sugar - or however much or little as you like, according to taste.
Medium bowl suitable for the microwave.
Wire wisk.

Methods

Combined grated lemon rind, sugar, and butter in a medium bowl. Whisk together eggs and lemon juice, then strain into the bowl. Microwave at a power level of ~6 for 2 min. Stir. Continue microwaving for 2 min intervals (usually two more is all that is needed) at a power level of ~5. Whisk between intervals.

The curd thickens as it cools.

Fruit flan with lemon curd 

Friday 14 October 2011

Welcome!

Welcome to my kitchen and laboratory adventures. I am an MD/PhD student who enjoys the freedom of experimenting with flavours and textures  without the microlitre precision that characterizes my benchwork.

It is difficult to disguise the result of a kitchen experiment as something that it is not (sauces and condiments aside!) If the raisins don't work so well with the rest of the mix, you can't pick them all out. With scientific data, because we present the report and not the product itself, there is an extra level at which it is tempting to edit out the raisins. I like to consider questions related to objectivity in science, and the epistemological consequences of the way we fund and carry out experiments. For some of these reflections, check "The Laboratory."

For recipes, check "The Bakery." These are bound to be far more useful.

No-knead bread: easier than going to the grocery store or setting up aPCR!


If you buy loaves of bread, you should start feeling guilty after looking this over. Adapted from a 2010 Vancouver Sun column by Gwendolyn Richards (who in turn adapted it from Jim Lahey's My Bread, W.W. Norton & Company, 2009), this recipe takes about 5 minutes of hands-on time.

If you meet the following criteria, you can make this bread:

1. You will be at home two nights in a row.
2. First night: you have 2 minutes to spare, and a bit of flour and water.
3. Second night: you have 2 minutes to spare, followed by a 2-hour rising interval and 30 minutes of cooking.
4. You have a pot with a heavy lid that withstands 475 F. A cast iron pot is perfect. Canadian Tire at Cambie and Broadway in Vancouver seems to have overstocked their supply of red Kitchenaid cast iron pots because each week there is a different pot of this type on sale. 4-5 quarts is ideal.

[
The recipe

1. Stir together the following in a medium bowl, until uniformly combined:

  • 3 cups flour (a 50/50 whole wheat/white split works well for a nutty flavour)

  • 1.5 cups of water

  • 1.25 tsp salt

  • 0.25 tsp instant yeast (I use traditional yeast and let it sit in the water for about 5 min first)

2. Cover the bowl with plastic wrap and let sit at room temperature to ferment for 18-24 hours (or thereabouts).

3. Use a rubber spatula coated in flour to gently scrape the dough away from the side of the bowl. Gently remove it, tuck the edges under to form a hemisphere, and place on a piece of parchment paper with the seam side down. Cover and place in a warm spot for 2 hours to rise.

4. Place a covered heavy pot on a rack in the centre of the oven. Preheat the oven and pot to 475 F.

5. Once the oven is up to temperature, gently drop the parchment paper into the pot, replace the cover, and cook for 25 minutes, until golden brown.

6. Remove the lid and continue baking to brown the top of the loaf until it reaches the desired colour.

7. Cool on a rack for at least an hour, if you can wait that long before enjoying a slice.


Modifications
You can use the same method to make small buns, into which you can incorporate various fruits in step (3), like the blue grape buns above. For savoury breads, include herbs such as rosemary, finely chopped and incorporated into step. You can also incorporate your favourite cheese in step (3).